Monday, October 22, 2007

"The Mushroom That Ate My Brain"

Matt and his Puffball

My friend Matt in Minnesota sent me pictures of this mushroom that he found. Later today he called me for a chat and I begged him to tell me the details. I was totally fascinated by this queer oddity in nature, and even more aghast that he and his roommate, Rick consumed it!

He found this mushroom in their backyard one day while searching for the cat, Umbra. At first glance he thought that the white blob was a discarded grocery bag, but when he got closer he realized that it was a huge fungus. It looked like a head and had a gaping mouth that immediately reminded him of Audrey II from "Little Shop Of Horrors".

It just so happens that Rick had friends that had published a book called Start Mushrooming by Stan Tekiela and Karen Shanberg, and they were able to identify this colossus as an edible puffball (Calvatia gigantea). This puffball was in it's younger state. When they mature they become swollen with spores. All the time just sitting there hoping that something will come across it and burst it. This sends the spores out for future procreation. At this point in the life of the puffball it is poisonous. Ewww, very alien like. Does it have acid for blood? God, isn't nature just great? Better than most science fiction!

Matt also informed me that these usually grow in pairs or sometimes three. He stated that there were three indeed, but one was not fit for eating, and the other one was so small that he accidentally stomped the living daylights out of it with his foot!

So, upon the harvesting of this alien looking thing, they had already decided what they were going to make. They found a mushroom soup recipe, and then were going to cut hanks of it and make "steaks."

He also noted that it was rather hefty and had substantial weight. I don't think they they ever got the official weight or measurement of it. It was definitely bigger than his head, and for all of us who know Matt, that's huge! (Just teasing buddy! You know I love ya!)

He described the flavor as earthy but a little bland, and the texture is what really surprised him. "I'm not going to say that it was like tofu, because that just grosses me out...it was like fresh mozzarella cheese. Very creamy." I suspect much to his chagrin that he didn't experience any hallucinogenic properties!

How interesting. I am just amazed that they just happened to have access to this book, took the chance to pluck it from it's home, chop it up and eat it! I don't think that I would be that adventurous. I mean, I have eaten a lot of weird things in my life, but this would be for me like playing Russian Roulette.

Maybe now that I know they haven't died or suffered serious side effects, I would try something they would make from this one. Which could very well happen, because they weren't able to eat it all in one sitting. Or even a couple sittings. The rest of the 'shroom rests comfortably in cryonic suspension for a later day. All I need to do is get a plane ticket now!

I think I need to do more research on this gastronomical phenomenon. Being the scientist at heart, I bombarded him with all sorts of questions. Like he's a mycologist or something! I just love stuff like this!


When I look at these pictures it makes me chuckle. It's a bit comical to see a what-seems common thing so large like this. Kind of like putting us in the perspective of being a mouse and stumbling upon a huge piece of cheese or something.

"Yo dude...look what I found! We can feast for months!"

Lovely Lentils


I was craving something very hearty and quick today, but I was limited on what I could make. My pantry's contents are limited, and I really need to stock up. But, due to my incredibly creative and innovative mind (ha!) I was able to whip this up. Pretty much everything I make is like shooting from the hip. Sometimes I am right on target, other times I miss. This one was a near bulls eye.

Lentils With Turkey

serves 1-2

2 T olive oil
2 crushed garlic cloves, finely minced
1 small onion, chopped coarsely
4 cups vegetable broth - one carton (would be richer with chicken, but this is what I had in the pantry)
1 t dry thyme
1 T ground cumin, heaping if you like more flavor
2 bay leaves
1 cup chopped cooked turkey, or any other cooked meat you may have
1 cup green lentils, washed and picked over for stones
couple pinches of kosher salt
fresh ground black pepper

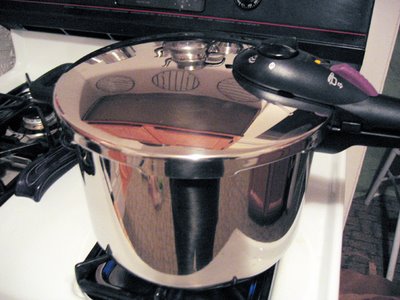
You can make this the conventional way, but I used my pressure cooker so the method is for that. You'll have to wing it if you want to use a normal pot.


On medium high heat add olive oil to the pan (used the small pressure cooker size, came as a big and little set). Sweat the onions and garlic, then add the broth. Add all of the spices, turkey, and lentils. Stir and then bring to a boil. Slap on the lid of your pressure cooker, seal, and lower the heat to low. There will be a small amount of steam emitting. This is what you want. Set your timer for 25 minutes.

When the time is up, release the steam, open and enjoy!

After woofing this down, I realized that I could could have jazzed it up a bit. Maybe add some finely diced carrot for color and sweetness, and perhaps a little heat by adding some cayenne or something to that sort. Some curry powder would be divine too.

I'm debating on if I want more, but I think I'll save it for later. Love leftovers!

Monday Morning Meal

It's been ages since I've posted anything of real subsistence here! Now that I know what's up with my life for the next 6 months (at least) I will make an effort to maintain my little quaint foodie blog.

The light was so lovely coming into my kitchen window that I had to snap this picture. It's not a photographic victory, but I think is conveys something warm and comforting. It snowed most of the day yesterday, and I have the heat cranked up today. The bright sun streaming in was very warm and comforting. Which I thought was very fitting for my breakfast of hot tea and peanut butter and toast.

I'm mad about green tea, and I have about a dozen different types in my pantry to choose from. The selection of the morning is 100% organic Genmai Cha with roasted brown rice. It's so light and nutty, and partnered well with my whole wheat toast and peanut butter. I've never been a fan of peanut butter growing up, but I'm finding as I'm getting older I've finally acquired a taste for it. Plus I was all out of butter and needed something to spread to avoid dry toast!

I have to admit that I've been in a bit of a slump lately. I think it was the stress of my job and wondering where I'll be and when I'll be there. Now I've got a better sense of what's happening, so I can get back to the things that I enjoy such as cooking for friends, cooking for myself, and taking pictures.

Everyone that knows me knows that I love writing and expression, so I'm back in the saddle again. Or back in the kitchen again would be more fitting.

Sunday, October 7, 2007

My First Wedding Cake, and It's Not Even Mine!


This was my first attempt at decorating an official wedding cake, and I must say that it turned out fabulous! I had the bride order the 1/2 sheet cakes from the bakery and a huge tub 'o icing. I went and picked them up the morning before the wedding and went to town.

I did a basket weave motif, then she placed the topper on where she wanted it, and then arranged the flowers. I liked it a lot!


The flowers turned out beautiful too! I arranged most of them and gave a class, so the bride did some too!

These were so much fun to make as I love arranging flowers in vases, and have come to the realization that I love making bouquets, wrist corsages, and boutonnières.

The flowers were beautiful and came from Sam's Club. I must remember that if I ever have to get a large amount of flowers for what ever reason in the future.


Monday, July 30, 2007

Pizza Part 3


I know, it's pizza again! I just love it! In the summer time I don't like to fire up my oven indoors so I resort to grilling the pizza outside on my gas grill. I just bought a new house so I've been taking advantage of my beautiful garden and my beautiful shiny new grill!

It's so easy to make and it's so delicious. I haven't bought a pizza in ages, and grilling the pizza makes it so crispy and wonderful that I'll probably be making these out on the grill even when there's a foot of snow on the ground!

Saturday, July 28, 2007

Sorry I've been neglecting my food forum!

Yes, I have been eating. Yes, I have been whipping up wonderful dishes and fantastic foods. Yes, I've been sorely neglecting my blog, and promise to post very soon!

Sunday, March 11, 2007

Pizza Part 2


I always say that there are two types of food that I will eat regardless be it fresh or frozen, good quality or so-so quality...crab and pizza!

I like pizza, a lot and I'll pretty much eat most types as long as it's not foul or tastes bad. Frozen is usually what I opt for when I'm at home since I've found nice organic pizzas in the freezer section at my local natural food store, but homemade is even better!

I cheated this time and used a frozen white bread dough. The last pizza I made (my first comestible creation in fact) was good, but took a lot of work. Plus the dough was whole wheat and very dense (but tasty nonetheless). So this time I thawed and rose as loaf of pre-made dough from the freezer section. I admit, I do live the refined white bread!

I also used my latest kitchen gadget, my new wooden pizza peel and backed the pizza on my old trusty stone.

Garlic Chicken & Balsamic Onion Pizza

1 lb frozen bread dough (thawed and doubled in size)
chicken thighs (cut into small pieces...you can use white meat, but I like dark)
1 T zesty salt free seasoning blend
6 cloves garlic, finely minced
1 small onion, small diced
2 T balsamic vinegar
olive oil
2 T tomato paste
variety of dry or fresh herbs
4 oz 5 blend Italian cheese (found prepackaged in the cheese case)

Preheat oven to 400 degrees Fahrenheit.

Saute the chopped chicken with the seasoning and garlic in small of amount of olive oil. Remove from pan and put in a dish. Sweat down the onions in same pan and deglaze with balsamic vinegar. Cook on low and slightly caramelize the onions (about 10 minutes). Remove and place in another bowl.

On a 14" pizza peel stretch out dough to form a 12" (approximate) crust. Dust the peel with corn meat to ensure that your pizza will slip off easily. You can make the pizza on a pan or on the stone, but it's best to cook the pizza on a hot stone.

Spread out the tomato paste, sprinkle liberally with varied herbs of choice (I used basil, oregano and fennel seed). Then take the onions and sprinkle on pizza, followed by the chicken. Cover with cheese and bake on hot pizza stone for 15 minutes or until cheese is melted and the crust is golden brown and delicious! Time to dig in!

Saturday, March 10, 2007

Muffin wo-Man

Nothing is better to me than a nicely toasted English muffin spread with butter. Yum! Even though it's quite easy to run out to the store and pick up a package of one of the many varieties, I thought I'd try it at home. After all, I know what is going into my muffins and homemade seems to taste just a little better.

I tried Alton Brown's recipe and found that it was lacking. It tasted to me more like a very dense pancake, and in fact I really didn't like the flavor or the texture at all. So I found this recipe.


English Muffins

1 2/3 cup milk
2 1/2 T butter
1 package active dry yeast
1 heaping T sugar
1/3 cup warm water (110-115 degrees Fahrenheit)
1 large egg
2 t salt
1 T vinegar
5 cups unbleached flour (sifted)
cornmeal

Heat the milk and melt the butter in it. Set aside to cool

Combine the yeast, water, and sugar. Allow to proof for a few minutes

Combine the cooled milk mixture with the yeast mixture in large bowl. Add the egg, salt, and vinegar, along with half of the flour and mix at medium speed for about 5 minutes. Add in remaining flour and mix well. It's better to spray your beaters with cooking spray to keep the dough from climbing up them. The mixture will be very sticky. Cover and allow to rise in a draft-free area for 1 hour.

Heat a griddle or skillet (I used an electric one and preheated to 300 degrees Fahrenheit)

Pour cornmeal into a bowl. Take approximately 1/2 cup of the dough (less works a bit better) using two tablespoons to portion out and form into a ball. The mixture is quite elastic and this isn't too hard to do. Drop dough into corn meal and sprinkle then flatten. I then dropped these into my nonstick egg mold rings on the electric nonstick skillet and lightly pressed the dough into the mold. They are about 3 inched in diameter.

I put the lid on the skillet and cooked on each side for 7 minutes.

These are tasty toasted, but not exactly like traditional English muffins. In fact, they are something different all together I would say. Enjoy!

Saturday, February 24, 2007

Fresh 'n Fizzy

I apologize for not posting for quite some time. I had major surgery three weeks ago, but now I'm finally getting to the point of recovery that I feel like cooking and posting. A few days after getting home I was able to order grocery delivery, and I purchased a small crate of Clementine oranges. I love these little guys, but there are only so many a single person can eat.

So, this morning I decided to peel and juice them in my Magic Bullet. I also purchased a new gadget by Soda Club. I love sparkling water and having this machine in my home makes it easy to make my own. Anyway, I squeezed some oranges and mixed it with a fresh dose of carbonated water. Yum! So refreshing and good for you!

Sunday, February 4, 2007

BPW ~ My Valentine!

Woo hoo! My Valentine came from Northbrook, Illinois from Smitha Nair, and what a lovely card it was! Thank you, Smitha!

Sunday, January 28, 2007

Blogger Postcards Around the World ~ Happy Valentine's Day


I was thrilled to parttake in this event! How cool is it? For those of you who don't know how it works, please go to Blogger Postcards Around The World #2 - Happy Valentine's for more details.

Well, here is my card. I thought long and hard on how I wanted to do this, and Meeta gave us a theme on Valentine's Day. So, here is my effort.

When I was a child my oldest sister always gave us boxes of these little Valentine's candies made by Necco. They were very chalky and very cheap, and still remain to be, but each little heart had a quirky imprint.

I've noticed that they have changed since the last time I received them! With messages as "EMAIL ME", "URA 10", "IM ME" and such. I wonder who's on that board for changing the messages with the changing times? I remember phrases such as "GROOVY", "CUTIE", and "UR NEAT". They could easily bring those timeless words back as it seems that what was in style then is deffinately in now.

Take care and until next time, be good to your loved ones and most of all be good to yourself!

Friday, January 19, 2007

Coasting Through the Holidays on to 2007!

I know, I know, it's been a long time since I last posted, but hey...I just got back from a 30 day holiday! It was truly divine! First to Minnesota to see my parents and family, then to NYC, off to Houston to see the "Sistas", and then a relaxing week in Cozumel.

My friend, Leeah lives in Manhattan and I was fortunate enough to spend Christmas with her. She was generous enough to give me these clever little beverage coasters. She knows how much I love to take pictures with my old Polaroid camera.

I've put four of my favorite snaps that I took on my visit to New York City, and she's featured in the first one. In the picture above she is artfully standing in the foyer of the Solomon R. Guggenhein Museum. This was a great milestone in my life as I love art and I adore the architect, Frank Lloyd Wright who designed the museum. This capture is a bit dark, but the original image is quite striking.

Here is a picture of a bicycle that was secured on the side of the street. It was cloudy and rainy and the sun came out for a bit, and I was happy (along with the other millions) that it was saying hello.

Another milestone in my life...I'm at the Tiffany's that Audrey Hepburn stood in front of in one of my favorite movies "Breakfast at Tiffany's". The place was packed, but we were able to make our way in and bought a new key chain to add to my growing collection of T&CO.

My final photo is my departure of NYC on to Houston. I took this at the John F. Kennedy Airport while I waited for my flight.

If you'd like to take a look at my pictures please click on the link to to the right or go to dinaripper creations: photographs. Yes, a shameless plug to get people to peer at my pics! Talk to you again soon! Next time I will be cooking up something tastey I hope!

Monday, December 11, 2006

Passion For Pomegranates


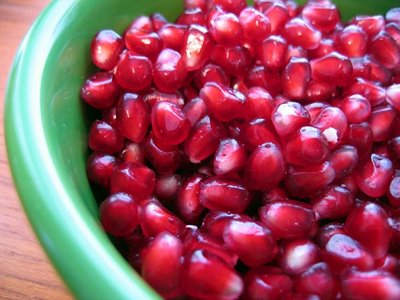
I absolutely love pomegranates. I think that I am the only person that I know that actually buys these jeweled gems just because I think they are fun to eat. Not only are they so tangy and good for you, I find them really fun to harvest the seeds.

It's like cracking crabs, or shelling nuts, to me it's worth the wait and effort. Today I ran this bowl of seeds through my Bullet juicer. Which by the way is the first time I've ever used the juicer attachment. I will have to do an ode to my Bullet sometime soon.

After about 20 minutes of seeding and peeling, and hand picking each morsel, I threw them all into the mechanical macerator and extracted...oh about 1/4 cup juice. Not a lot of payoff for my efforts? I beg to differ.

Sunday, December 10, 2006

Season's Eatings


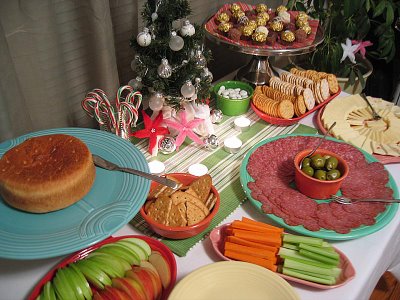
The other night I had my first dinner party since I'd been back from the sand box. It went well. I had nine diners (including myself) and a little toddler, and there was plenty to eat. The menu comprised of:

Appetizers:

Various cheeses and crackers
Warm brie en'croute with apples
Various hard Italian salamis
Various candies and chocolates
Garlic stuffed green olives
Bread and dipping olive oil with various spices
Carrot and celery sticks
Egg Nog
Various wines (PLENTY of wine)

Main Course:

Stuffed pork loins
Roasted new potatoes with onions
Gravy
Deviled chicken
Broccoli with garlic and olive oil
Homemade four cheese ravioli with marinara
Various wines (More and MORE)

Dessert:

Tiramisu
(see November 16 post "The Best Tiramisu" for recipe)
French-pressed fresh ground coffee

I think everyone felt well sated, and after several ruthless (and drunken) games of Cranium we called it a night. The next morning the cleanup was minimal and fairly painless (only seven loads of dishes in the sink), and I had a good warm feeling that this holiday was celebrated and acknowledged as it should be. There really is no place like home.

Monday, November 27, 2006

Asparagus Atonement


I must confess that I harbored ill feelings towards asparagus for a long time. I grew up on a farm, and this grassy veggie was plentiful, but I could not stomach eating it. My mother used to chop it up, boil it to near mush, and cream it. Ugh. I'm sorry, but something so fresh and lively as asparagus needs to be complimented, not smothered.

So, many years later I took the leap to try it again when my sister had whipped it up one night. She barely blanched the bunch in boiling water and then threw it in a frying pan with some butter and garlic. We then threw on some salt and pepper and I tell you what, I fell in love.

Now I make asparagus all of the time, and here is my favorite way of eating it. Everyone who knows me knows that I have this passion for kitchen gadgets and things. Well, I've fallen so hard for asparagus that I purchased a special pot to steam it in. It's tall and very thin with a wire basket that fits inside (yes, the sweet stems stand up while steaming, tips upward please) and then you cover it with a lid.

It's very simple to use and putting in only a few inches of water on the bottom and bringing it to a boil seems to do the trick nicely. The veggie is nice and evenly crisp from bottom to tip, and never overdone. Oh, you can use the pot for other things too when you're not cooking up asparagus. I boil eggs in mine, and the nice basket helps me lift them out and cool them down under running cold water.

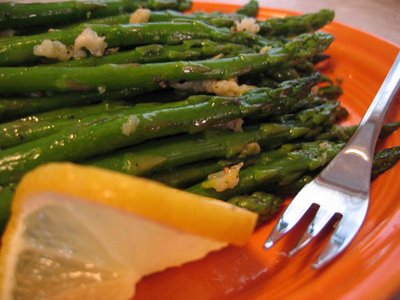
Asparagus & Garlic
Serves 1-3 people

1 bunch of fresh asparagus (I like the thinner stalks, but you can get whatever you'd like)
1 T extra virgin olive oil
4 cloves garlic, crushed and coarsly chopped
kosher salt
fresh ground black pepper
a healthy sized lemon wedge (about a quarter)

Prepare the basket with the cleaned asparagus. I don't cut off the ends, I just give it a gentle bend, and wherever it snaps off is suppose to be more woody and should be discarded. You can just trip off the bottoms with a knife if you don't mind the tougher ends. Do not put the basket into the pot with the water until it comes to a boil. Once it does, slip the basket in and cover with the lid. Now is the time to prepare the ice water bath. Just fill up a container with cold water and throw in a couple of trays of ice.

Steam the asparagus for approximately 3-4 minutes depending on how crunchy you like them. I just pull the lid off, reach in and grab one to sample. At this time they are a vibrant green, and I like to make them just slightly underdone as I reheat them anyway. Pull out the basket and pour the steamy stems into the ice bath. Move them around and they should stop cooking almost immediately. Let them sit in the water.

In a heavy frying pan, heat up the olive oil over low heat, add the garlic and saute till fragrant but the garlic is not brown. Turn the heat to high then grab the asparagus by bunches (you don't have to drain them too carefully as the moisture helps in the saute) and throw them in the pan with the garlic. Sizzle! Move the asparagus around to coat evenly and saute for approximately 2 minutes or heated through. Sprinkle with some kosher salt and a generous grind of coarse black pepper.

Plate on a platter and spoon over any garlic and oil that may be left in the pan. Gotta get all the good stuff! Squeeze the lemon wedge over the top and garnish if you'd like with lemon slices. Serve immediately although this is just as good at room temperature.

I am so glad that I put my fears aside and enjoy this simple but elegant dish. Well, I must admit that I prefer to eat asparagus with my fingers. Happy eating!

Sunday, November 26, 2006

Sweet Santas


Aren't these sweet in more ways than one? They are so...well, adorable. They are very simple to make, and I saw the idea in a little cookie book that I picked up while waiting in the check-out line at the grocery store. It was chock full of old-fashioned (and new-fashioned) treats for the Holidays.


Sweet Santas
Yields 32 cute cookies.

3 blocks of white chocolate bark (you know, it comes in those "ice cube-like" trays)
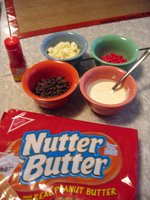
1 package (1 lb) Nutter Butter sandwich cookies
red colored sugar
32 vanilla or white chocolate chips
64 miniature semisweet chocolate chips
32 red hot candies

Follow the white chocolate bark melting method noted on November 22's post of "Bacon 'n Eggs". Melt in a small, deep type bowl. It will be easier to dip the cookies.

Dip one end of each cookie into the melted white chocolate and sprinkle the top part of the hat with the red colored sugar (be sure to keep some white for Santa's trim). Place a white chocolate chip on the hat for the pom-pom. Lay out on waxed paper or a silpat mat, and let the chocolate set. Work each one till you get all the hats finished.

Now for the whiskers. Dip the beard end of the cookie with the first cookie you started with. Set down to set. Take a table knife and dip the tip in the now slightly cooled white chocolate. You will get a "V-like" drip, take this and dollop the eyes and nose and place two mini chips for eyes, and the red hot for nose. Work each cookie one at a time.

Before you know it, you'll have rows upon rows of happy sweet Santas, and plenty to put out on Christmas Eve night for the Big Guy In Red.


The peanut butter flavor and the white chocolate bark is a nice combination, and I'm certain that they will be gobbled up in no time. Stop by again for more treats for the Holidays.

Hearty Beef & Barley For One


Remember that beefy stock I made last week in my pressure cooker? Well, along with consuming half of it making quick single soups, I froze the other half in my silicone mini muffin molds and stored them in a baggie in the freezer to use at my disposal. I also picked the meat off of the broth bones and froze. There is not a lot of flavor left in these very tender morsels, but if you chop them up and re-add them to this dish, it's very tasty and adds nice texture and protein.

Since it's getting colder now and getting into wintertime, I had a hankering for something hearty. I concocted this tasty late lunch for myself while I was watching one of my favorite cooking guys, Alton Brown.

Although I could have cut the cooking time down to nearly nothing in my pressure cooker, I opted for the range in a small and heavy sauce pan with a tight fitting lid. This way I could season and tweak to my liking. Because being at over 6,000 feet above sea level it took nearly an hour to simmer this up, but it was well worth the wait.

Diane's Hearty Beef & Barley
This is a hearty single serving, or two smaller, but still satisfying servings.

1 1/2 cups beefy broth (see November 20th's post "Under Pressure")
1/2 cup organic dry pearl barley
1/4 dry onion flakes (better than fresh for this dish because the flavor is more concentrated)
1/2 t dried thyme
1 t crushed fennel seed (you can cut this back to 1/2 t, I love fennel)
1 t Mrs. Dash garlic and herb seasoning
1 large button mushroom, coarsely chopped (more if you'd like)
a few sprigs of fresh parsley, finely chopped
chopped cooked beef (about 2 oz)
kosher salt
fresh ground black pepper
boiling water (used to add while the barley absorbs)

In my case I melted the stock cubes over high heat and brought to a boil, then I added all of the dry ingredients, chopped mushrooms and beef and continued to cook for a minute or two. I added the pearl barley and brought the flame down to low, put the lid on and simmered for 20 minutes.

After the first 20 minutes was up, I added about 1/2 cup of boiling water, stirred, and continued to cook for another 20 minutes letting the barley soften. I then checked it and decided to add another 1/2 cup boiling water, and cooked for another 15 minutes or so. Keeping the lid off at the end to let the "broth" reduce.

Even though I kept adding water throughout the cooking period, it didn't hinder the richness of the beef broth. On the contrary, cooking this way helped me control the consistency of the barley to slightly chewy, and the dried seasonings were very flavorful. Season to taste with salt and pepper.

Now...bring on snow!

Wednesday, November 22, 2006

Bacon 'n Eggs


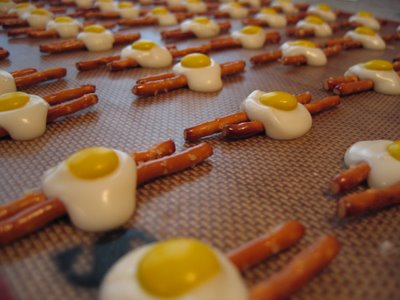
This is my signature sweet for the Holidays. I whipped up a batch or two for Thanksgiving, and will make plenty more for Christmas. It's so easy and so CUTE!

Bacon 'n Eggs


1 package white chocolate bark
yellow M&Ms (get the biggest bag you can and only sort out the yellow ones, save the others for munching or cookies)
pretzel sticks

Layout two pretzel sticks side-by-side (kind of off set them as that makes them more quirky and cute) in rows on waxed paper or a silpat mat. Chop up white chocolate bark and melt in microwave (use a good solid stoneware bowl as it will retain the heat longer and keep the chocolate pliable). Put a dollop of melted chocolate roughly in the middle; do only 6 or six at a time. You don't have to be perfect since eggs aren't perfect. Place a yellow M&M on top, hence this is the yolk. Let set and package in airtight container. Be careful not to break the pretzels.

I like to pack them into seasonal cellophane baggies tied with curly ribbon. I know I'm such a sap, but hey...it's the holidays!

Monday, November 20, 2006

Under Pressure


I've been on the Good Eats kick with Alton Brown, and he had a show where he made beef broth in a fraction of the time it would take to make the conventional way.

I've just followed the below recipe (substituted oxtail with beef back bones as there was not oxtail), cooked under pressure for 60 minutes (he calls for 50 minutes, but A-HA, he's not at nearly 6,000 feet above sea level either!) and I'm letting it cool down naturally. The broth will continue to cook and therefor making it more rich and savory. YUM-O!

I was very skeptical about pressure cooking. Growing up on a farm I had my share of meat-and-potato meals. Well, my parents had a pressure cooker which they would boil our potatoes in. That thing scared the bejeezus out of me! It rattled, it hissed, it was noisy, and I was always terrified when they released the steam and forced it open. Plus, I never realized why they used it (knowing now that pressure cooking cuts the time down to nearly a third of the normal cooking time).

After Alton gave me the strength and confidence to go out and purchase one of these devices, I was pleasantly surprised. Again, my broth has been pressure cooking for an hour, and I've turned off the heat. I barely heard the thing! I think I'm going to go and see what this quick release steam thing is all about now! I guess I'll sacrifice a bit more richer and savorier broth for the sake of workin' the new gadget!

AB's Beefy Broth

Vegetable oil
Salt and pepper
3 pounds combined beef shank and oxtail pieces
2 onions, quartered
2 ribs celery, halved
2 carrots, halved
3 cloves garlic
1 bunch parsley
1 teaspoon black peppercorns
2 quarts water

Place pressure cooker over high heat. Oil and salt the oxtail and shank pieces then sear in batches. Add remaining ingredients and cover with water, being careful not to fill above the cooker's maximum fill" line. (If your pressure cooker does not have a water line, fill the pot 2/3 full). Bring to a boil and skim off any foam that gathers at the surface. Cover and lock lid. Once pressure builds up inside the cooker, reduce the heat so that you barely hear hissing from the pot. Cook for 50 minutes.

Release pressure using your cookers release device (read that manual) or cool the cooker by running cold water over the lid for 5 minutes. Carefully opening the lid and strain squeezing the solids before feeding to the compost pile, or the dogs. Strain through a fine sieve or several layers of cheesecloth. Season and serve or use as a base for other soup recipes.

Super Salad


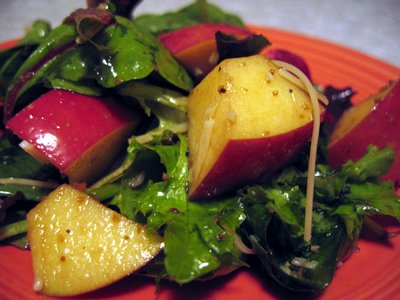
The other night I had made a great lasagna dinner (sadly I did not archive that meal) and I shook up my own dressing. Well, tonight while working on my latest adventure I threw together a quick salad for munching while I waited for my creation to finish. Here's the quick fixing for the dressing and it's even better as it sits in your fridge!

Balsamic and Olive Oil Dressing

1/8 cup water
1/4 cup Balsamic vinegar
1/2 cup good virgin olive oil
1 T Mrs. Dash Garlic and Herb seasoning (or any other generic like)

Pour all ingredients in a shaker and...well, SHAKE! You should let it sit for at least 15 minutes before serving and it gets better with age, but try to use it with a couple of weeks.

Now, take fresh mixed baby greens and cut up one Fuji apple (or other sweet,tart, and crunchy kind, tart Asian pears are good too) into chunks and throw on top of the greens. Drizzle ample dressing on top and toss. Add fresh shredded Parmesan cheese and enjoy! This is also great with feta cheese crumbles and sugared nuts.