Friday, July 22, 2022

Good for the Soul!


I have been spending days and days freeze drying (FD) ingredients to make dry meals to take camping.  Today I put the first meal together and I was able to try it out.  I used a combination of dry ingredients I already had on hand and FD ingredients.  You can use either or.

The picture of the finished soup is minus parsley and I was running low on carrots.  Regardless, it was so good!

Chicken Noodle Soup Mix (Shelf Stable - Makes 2 Servings)

2 cups dried egg noodles (you can use 3 cups FD noodles)

3/4 - 1 cup FD chicken breast (FD rotisserie chicken breast from Costco!)

1 tablespoon chicken bouillon granules (I used Knorr Chicken Flavor Bouillon)

1 tablespoon dried minced onion

2 teaspoons FD minced celery

2 teaspoons FD minced carrot

1 teaspoon dried parsley

1/4 teaspoon ground black pepper

In a quart sized

In a thick Mylar bag, add oxygen absorber and layer in ingredients.  Seal and store in a cool, dry, and dark space until ready to use. 

I marked mine for five years, but all dehydrated ingredients can be FD to ensure all moisture is removed for long-term storage (20+ years).

Really, you could add or omit any ingredients you would like.  Regardless, this recipe has been tested and as is, makes a delicious and hearty soup!

This recipe can be multiplied to prepare more servings.


To Make

1 Package Chicken Noodle Soup Mix

6 cups water

Bring water to a boil and add contents of pouch.  Boil until noodles are tender (about 15 minutes).  Serve and enjoy!  If using FD noodles, hydrate until noodles are tender, or boil until noodles are tender.


Monday, July 11, 2022

My Freeze Drying Adventure Begins!


Imagine that advertisement for THX sound. MmmmmmrrrrroooooowwwwwwwwwwwwWWWWW!


I present to you...the Harvest Right home freeze dryer! YES! Freeze dryer! This is no dehydrated. This takes food preservation to a whole new level. To a "Preparing for when the S*** Hits The Fan" level!

Dale keeps hoping that the Zombie Apocalypse is bound to happen. Well if a rabid virus spreads around and turns our friends into brain-eating un-dead, we'll have plenty of delicious food to hold down the fort. Or at least until our friends come over and eat our brains! 

This baby has been running continuously since it was dropped off at the beginning of the month. Of course, barely read the instructions and dove in head first.
And the adventure begins.....

Wednesday, June 23, 2021

I'm Pickled Pink to Be Back!

Hello!  Whew, we survived 2020 and we're well into 2021!  I know, I know, I've been very bad in posting delicious and easy recipes, but I have been so busy!  Me and the man decided to give up our day jobs at the beginning of the year and have taken the plunge into retirement.  Yeah!

I've been busy with going back to school, traveling, and other homey things!  I took a trip to visit my sister, Dori, in Texas and she put on a huge spread, Texas style!  She made an Asian themed assortments of meats and served this quintessential veggie side, pickled carrots and radish.  This slightly sweet and tangy mix adds an extra POP to your BBQ sandwiches (bahn mi sammies anyone?), salads, wrapped spring rolls, or eat straight from the jar!  

This is so simple and relatively quick to make.  So, give it a try and add a little excitement to your summer dining!

Vietnamese Pickled Carrots & Daikon (Đồ Chua) (yields about 1 pint packed)

1/2 pound carrots; peeled, washed, and julienne cut (you can slice thinly into rounds on a mandolin or shred on a box shredder)

1/2 pound daikon radish; treated the same way as the carrots! 

1 teaspoon sugar

1/2 teaspoon sea salt or kosher salt (do not use iodized table salt! Blicky!)

FOR BRINE:

1/2 cup warm water

1/4 cup sugar

1/2 cup white vinegar plus 2 tablespoons

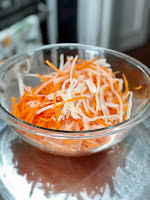
Julienne Carrots and Daikon Radish
 
In a glass or ceramic bowl, sprinkle 1 teaspoon sugar and 1/2 teaspoon sea salt onto shredded carrots and radishes.  Again, you can use a special julienne slicer (if you have it), box grater, or even mandolin for thin round slices.  It's up to you!  Just don't cut your pieces too thick.


With a clean or gloved hand, gently mix and massage for about 3 minutes.  Your veggies will give out quite a bit of juice and become very limp.


Rinse the vegetables well with cold water and drain well.


Massage Veg Mix with Sugar and Sea SaltDivide and tightly pack your vegetables into 2 pint jars.  They probably won't fill to the top, but that's okay.  You can combine the two later if you want.  In a large glass or ceramic cup or jar, dissolve 1/4 cup sugar into the warm water; add vinegar and stir well.  Pour brine over vegetables into each jar and place pickling weights on top if you have them.  If not, be sure that all the veg is submerged in the brine.  You may cover with a Mason jar and lid, but I prefer plastic lids made for Mason jars.  You can get them on Amazon and reuse over and over.

 Jarred with Glass Weights

I love to label all of my homemade/jarred goods with food service labels that dissolve in water when washed off.  That way you aren't stuck with jars and lids with labels stuck on them!  Again, you can get these from Amazon! 


Let the veggies sit at least overnight before eating.  They should last up to 4 weeks in the fridge!  If you don't eat them all up before that!


Sunday, June 7, 2020

Have Some Peanut Brittle ~ It's Been Forever!


Wow, it's been forever since I've posted anything here.  I don't know why I haven't.  Due to the whole world pandemic thing and working from home, I have been baking quite a bit...and working of course.  Ahem.

Well, I have decided that I'm going to get back into sharing my recipes with you all.  Or as they say in Texas, y'aaaalll.  So, as my first offering in a long time, I'm going to teach y'aaaaaaalllll how to make peanut brittle.

I know, I know, your Mother or Grandmother told you it was too difficult or took too much time to make peanut brittle, but this way is super easy and fast.  Nearly fail-proof.  I promise.  There's no pesky candy thermometers, barely any stirring, and the results are sure to impress.  Would I stir...steer you wrong?

Fail-Proof Peanut Brittle

1 cup sugar
1/2 cup light corn syrup
1 heaping cup of cocktail peanuts (I used delicious Hubs Peanuts!)
1 tablespoon butter
1 teaspoon vanilla extract
1 teaspoon baking soda

Prepare a baking sheet by lining with a silicone mat or butter heavily.  Do not use waxed or parchment paper.  Your brittle will not come off the paper, and like Alton Brown would say, "That's just not good eats!"

In a microwave safe glass bowl, mix the sugar and corn syrup together with a silicone utensil if possible.  You'll be stirring melted sugar and it doesn't stick to silicone as much.  If not, use a wooden spoon.  A metal utensil would cool the mixture off too quickly and then you'd have more on your spoon than in your bowl.


Pop this into the microwave (1,000 watt is what I have, so yours may differ) and set for 4 minutes on highest setting.  Again, your microwave may be stronger or weaker, so use this recipe as a guideline.  You can always cook a little more, but you can't take away burnt.  Don't be tempted to stop it and stir.  Let this long cooking time run to the end.


Using an oven mitt.  Always be careful because boiling sugar will burn, badly, and deeply.  Remove the bowl from the microwave and immediately stir in the peanuts.  Work fast!  You don't want it to cool off, but please be careful not to burn yourself.  Put the bowl back into the microwave and set for 3-1/2 minutes.

Again, using an oven mitt, remove the bowl from the microwave and immediately stir in the butter and the vanilla.  There will be plenty of bubbling and sizzling.  Remember, hot, Hot, HOT!  Place this back into your microwave and set for 1-1/2 minutes.  Don't be tempted to stop it and stir.

This is where you can adjust the flavor of your brittle.  Once the 1-1/2 minutes have passed, take a look at your brittle.  Better yet, take a whiff.  It's hot though, so be careful!  You can add 15-30 seconds more at intervals and your brittle will darken.

Some people like a lighter, milder brittle.  Where I on the other hand like mine pretty dark and nutty flavored.  Don't get me wrong, I have burnt some batches, but they weren't too bad.  The batch I made here I microwaved an additional 30 seconds and it's light for me.  I probably would have gone an extra 15 seconds.

Finally, with an oven mitt, remove the bowl when you've cooked the syrup to your taste, and quickly stir in the baking soda.  This is where the magic happens!!  The syrup will foam so keep stirring.

Quickly, quickly pour the foaming mixture onto your prepared baking sheet.  You can spread out with your silicone or wooden utensil, but I find it easier if you just tip the baking sheet and let the mixture spread that way.  Let cool completely, break into manageable pieces, and enjoy!

I remember my Grandma Howard always put baking soda in her brittle.  That is what adds the air into the syrup and you get an almost "honeycomb candy" texture.  You can omit the baking soda if you so desire, but I'm not sure why you would really want to!

There are other items you can add to your brittle prior to stirring in the baking soda.  You can add in finely chopped jalapenos or even habaneros.  It's fantastic*!  You may want to experiment adding a little cayenne pepper or even ground cinnamon, or both!

You can also make this with different types of nuts.  I've made this with cashews without changing the cooking times.  You may want to try almonds or even hazel nuts.  I'd be careful with tiny seeds like sesame or sunflower.  Just experiment and adjust times, or even add the seeds in before the baking soda to prevent burning.  Go wild and have fun!

Well, I hope you are glad to see me back, because I'm glad to be back!  When it's just me, Dale, and the puppies, my mind does a bit of racing, but in this day and age of computers, Internet, video chat, etc., it doesn't seem so bad.

Be safe, be kind, and be loving.  Until next time!


*NOTE:  I must warn you, although it's very tasty and a bit addictive, don't eat too much at one sitting.  Without getting too gross or graphic, trust me on this one!  Capsaicin (the element that makes peppers hot) can be a laxative.  I need say no more.