Dale and I were running errands today, and we stopped by a great shop near us called, Rocket Fizz. It's a super-cool candy and soda shop, and they had these gummi kits from Japan. You made your own gummies and then assembled them to look like different foods.
Of course I had to get the sushi kit. I love novel and quirky things like this. It's very detailed oriented, looks nearly really, and it's miniature! My favorite criteria!
It's called "Poppin' Cookin' Sushi Kit" and it was really fun to make. After we downloaded the English instructions from HERE. The instructions on the box are fine, if you are fluent in reading Japanese! There are pictures, but in this case, they are not worth a thousand words.
This plastic pouch is inside, but don't just rush in and tear it open. You need to cut where it indicates because you use this as your templates and "plates."
After you cut open the pouch, remove this tray and all of the mysterious packets and hardware. That little spoon is cute and looks like a tiny spade.
I trimmed the edges of the pouch.
Here are the different color coded packets of mix, the mixing tray, and the squeezy thing, and spoon.
The first thing I did was mix up the rice. I just used a small spoon to spoon in the minute amounts of water you're suppose to use. This mixture reminded me of when I attempted to make my own rice cakes. Now, that was an utter failure, but I won't bore you with the details on that. Back to our clever sushi!
So, after I made the "Tamago" or "egg omelet," I moved to the "tuna" or "Maguro." It was nice that you didn't have to work really quickly, but I didn't want to lollygag. Can you believe that the word "lollygag" didn't show up as a misspelled word? Ha!
Making the "salmon roe" or "salmon eggs" was THE COOLEST thing I've done all year. I felt like one of those super-hip molecular chefs. Just follow the instructions and you cannot go wrong! The results are amazing, and a little gross, but they do look like fish eggs when you are finished! This reminded me of that novelty soda in the early 90's called Orbit. Anyone remember that?
There was a little black stick of candy that you roll out, while using the handy template on the pouch wrapper. I improvised and was able to make another strip of "Nori" or "seaweed paper" for my tiny omelette sushi.
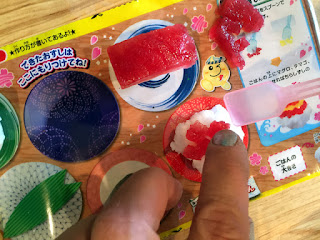
After all of my ingredients were prepared, it was time to make some sushi! I took the rice and used the little template to pack together into little cakes for my omelette and tuna.
I also took a piece of the seaweed paper and made into a ring and pushed a little rice into it. Then I spooned in some of the salmon eggs. I was thrilled by how real they looked, all plump and shiny!
After I assembled the other pieces of sushi, I assembled the "tuna tower" by using some of the tuna and egg, and chopping them up roughly with my spade spoon. Then I had to carefully top off some rice that I shaped into a disc. Working in miniature is a lot harder than you would think!
These were so adorable and merited me pulling out my Nikon and snapping some macro pictures. The tuna almost looks like the real thing!
I tried one piece and it was so fruity and jellied that it was a bit overwhelming for me. Something tasted really strong of peach, and well, I loath peach! Dale gobbled up the remaining "meal." He even used some the candy mix for "soy sauce." I kept searching for the wasabi and pickled ginger...but to no avail.
There were other kits, and I think we will get them when Dale's boys, John and Nicholas come out. This will be a good project for them. There were burgers, pizzas, and that was all I recalled seeing.
If you are ever in the Colorado Springs area on the north end of Nevada, you need to check out this candy shop. I was like a kid in a candy store!!
P.S. I couldn't get myself to get a "breast milk" flavored lolly. That was just too...ew, but of course that didn't stop me from taking a picture of it!


